Pandas is an open source library for python that provides new data structures and data analysis tools. Pandas provides three new data structures named series[1-D], dataframe[2D] and panel[3D] that are capable of holding any data type. Dataframe is the most commonly used pandas object. Dataframe can be visualized as a spreadsheet [2D structure with different datatype]. I would suggest you all to install the entire scipy stack before using pandas. More information is given at “How to install scipy stack ?”
Assuming that the installation is completed, let us get our hands dirty with pandas. Open your favorite python IDE. Let us first initialize a dataframe using python. The following piece of code initializes an empty pandas dataframe.
import pandas as pd

columns=['2002','2003','2004','2005']
index=['Zidane','Figo','Beckham','Totti']
df = pd.DataFrame(columns=columns,index=index)
print df
The output is given below:

This code creates a table with soccer stars names (rows) and the year(columns). We have just initialized the dataframe. Let us fill some of empty cells with the number of goals scored by the player.
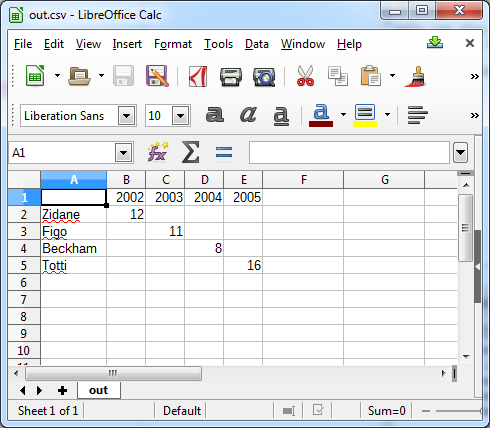
import pandas as pd

columns=['2002','2003','2004','2005']
index=['Zidane','Figo','Beckham','Totti']
df = pd.DataFrame(columns=columns,index=index)

df['2002']['Zidane']=12
df['2003']['Figo']=11
df['2004']['Beckham']=8
df['2005']['Totti']=16

print df
The output is given below.

In the output, we see updated cells. So to update a particular cell, ‘df[columnname][rowname]=somevalue’ can be used. So far, we have initialized the dataframe and updated values. Now let us save the data frame to a csv file. This is pretty easy. After updating the values use the below function to save the csv file.
df.to_csv('out.csv', sep=',')
This will save the dataframe to csv automatically on the same directory as the python script. The csv file in LibreOffice Calc is displayed below.
So we have now saved the pandas dataframe to a csv file on hard-disk. Now let us load back the saved csv file back in to pandas as a dataframe.
import pandas as pd

new_df=pd.read_csv('out.csv',index_col=0)
print new_df
The output is given below.

Congrats! you have successfully created a pandas dataframe, updated the values in the dataframe, saved it to a csv file and loaded back the csv file as new dataframe in python.